
With temperatures soaring (or in some areas storms approaching), it is an excellent time to close the windows, boot the laptop and brush up on your information management skills. This blog post is a basic tutorial on how to create proper authentication items with oAuth to connect to Twitter, use Talend to process the tweets and store them in a native form using MongoDB. It uses some fun technologies and can help you explore the value in data science and information management using your own data.
What you need to know:
Before we take off, there are some assumptions we have on what you already know and can do.
We assume that:
You can do a proper installation and configuration of MongoDB.
Download link: https://www.mongodb.org/downloads
You can install and configure Talend Open Studio for Big Data
Download link: https://www.talend.com/download/talend-open-studio
You’ll also need:
Talend Twitter Components.
Download link: https://gabrielebaldassarre.com/talend/twitter-components-talend/
Installation instructions: http://gabrielebaldassarre.com/2014/05/18/install-custom-components-talend-open-studio/
MongoVue, an IDE for MongoDB (optional):
Download link: http://www.mongovue.com/downloads/
Hands-on:
Step 1: Starting MongoDB server
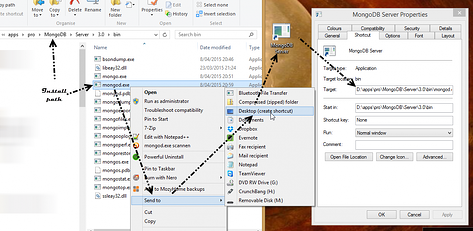
Create a shortcut and in the Target field amend the executable with the following command line parameters, telling it where you want the database to be.
D:\apps\pro\MongoDB\Server\3.0\bin\mongod.exe --dbpath "I:\data\MongoDB"
Double click the shortcut and a command prompt window should open, starting the MongoDB server. Leave this window open as long as you need the MongoDB server to be accessible. If you want it to be always on, it’s better to configure it as a service.
Step 2: Checking Talend
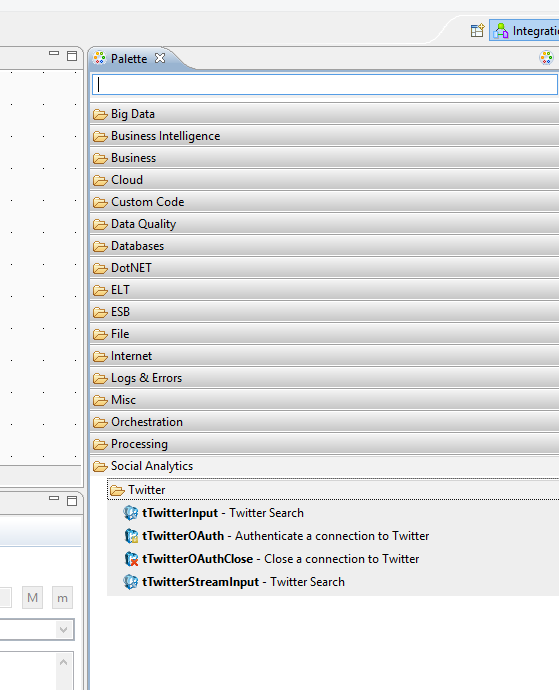
After installing the Twitter components, fire up Talend and click the ‘new job’ button. You should now see the following Palette on the right hand side, containing the Twitter components.
Step 3: Create a Twitter token
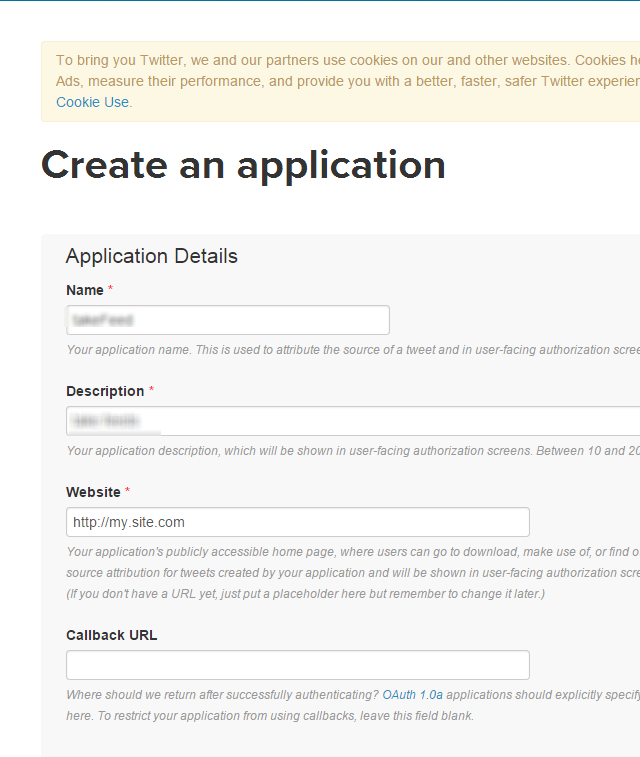
Log in to https://dev.twitter.com
Find de app manager (e.g. bottom of the page)
Click create new app
You’ll be directed to the details page of your new 'app'.
You will need to create a set of tokens for the Talend Twitter components to be able to access your tweets. To do that; go to Keys and Access Tokens and at the bottom, click Create my access token.
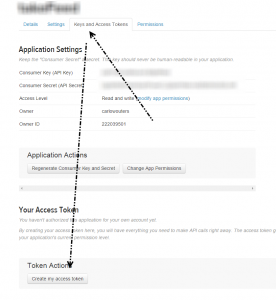
There should be an additional section called Your access token. Here you’ll find a number of fields. The application settings together with the access token section provide the needed data for your twitter component.
Step 4: Create jobs in Talend and dump the tweets to a file (JSON format)
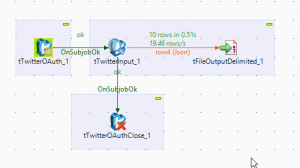
You'll need four components, three of which come from the twitter part of the palette (the newly installed components). Just follow these steps to complete the set-up.
- Create a connection to Twitter
- Get the (raw JSON) input
- Dump each row to a file
- Close the connection to Twitter
tTwitterOAuth_1
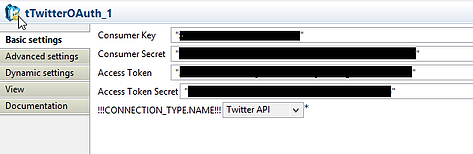
Copy the corresponding items from your Twitter app (application settings and access token).
Make sure that the connection type is the Twitter API. It's also possible to open up a stream (Twitter stream), but we want a process that runs periodically. If you're not planning to deploy this on a computer that's always on. You’ll have to take into account that you might have overlaps in tweets when you run this job, so the export to MongoDB should cater for that. That’s something we’ll handle later.
tTwitterInput_1
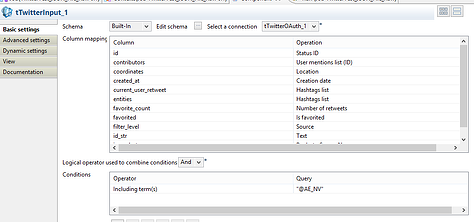
You have to make sure to select the connection (tTwitterOAuth_1 in my case), but it should be selected by default. As you can see we've made a complete column mapping, to show what it can look like, but we're not actually using it in this example. That’s because this component can send the mapped rows but also have an additional option to send the raw JSON to the next component.
I'm not quite sure whether the component maps all the possible fields, or whether it's done correctly. Furthermore, I've specifically selected a schemaless document store that is good in storing JSON docs, so I don't have to deal with mapping in an early stage.
If you're working with a relational DB, you probably want to use the column mapping. Please note that the operation possibilities are the hard-wired mappings to the JSON fields. That way you are unable modify these; you can only use what's been provided.
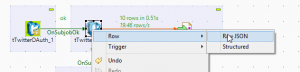
(Raw JSON doesn't use the column mapping, Structured does)
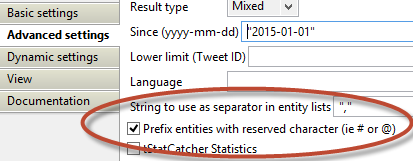
We don't want to have just any tweet. We specifically want those where the company's twitter account (AE, @AE_NV) appears.
As I'm using the @-symbol, and want to extract some more useful information by utilizing the reserved prefix characters (# & @), we’re checking the appropriate box in the Advanced Settings.
tFileOutputDelimited_1
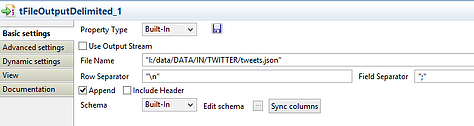
There is not a lot we have to change here. You only need to give it a filename. As I'm using a static name to make this example, I've checked append so that it doesn't overwrite data every time I run the job. Of course this introduces a lot of redundancy, but optimizing that flow is not the topic of this post.
Once you’ve linked the twitterinput with fileoutput (using raw JSON) you can click on the 'sync columns' of the tFileOutputDelimited_1 component.
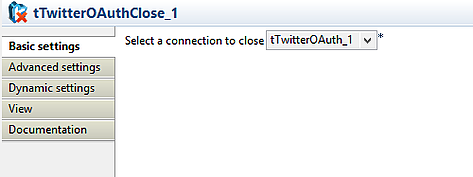
tTwitterOAuthClose_1
Save the job and then run it. If everything goes well, you'll see something like this:
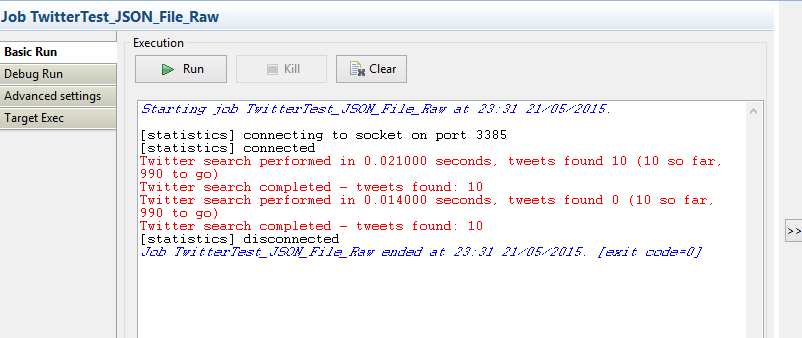
(I limited my search further so I wouldn't get too many results)
Make sure to check that the written file is in a valid JSON format:
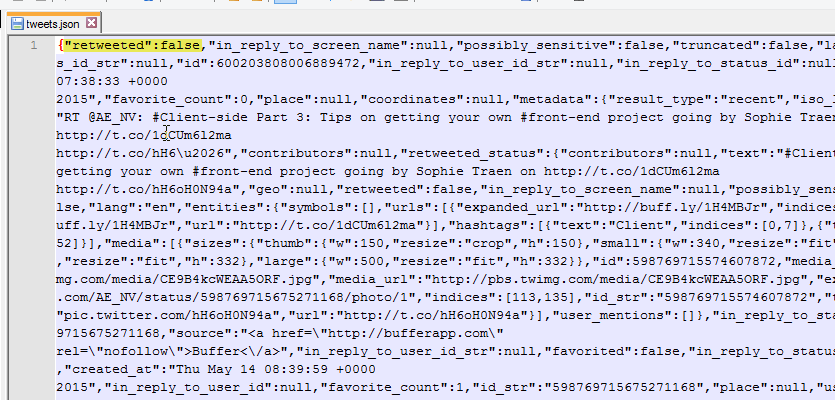
In case you're not familiar with JSON; what is important here is that each separate tweet is encapsulated in an opening and closing curly bracket. If the whole file starts and ends with square brackets; that's not what we want.
Another thing to check is that the key is always in quotes. Depending on the type of data the value can be in quotes as well, but it doesn't have to be (e.g. false without quotes). I've highlighted an example of "key":value pair.
I'm not going into details, but the hardest part was to figure out how the raw jsonString could be used to dump a correct JSON.
This is the only combination that worked for me:
- Selecting 'raw JSON' as row connector
- Using the delimited output file type (e.g. not tOutputFileJSON, or tOutputFileRAW).
Step 5: Load the JSON file into MongoDB
Don't worry, this is a piece of cake.
Create a new job, but just have a single component in it:
The configuration:
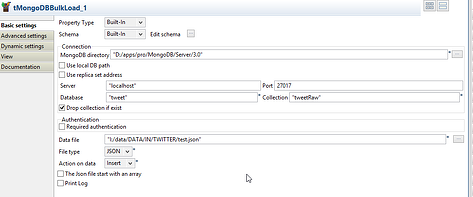
- MongoDB Directory is the path to the files for your mongoDB (what was specified in point 1) after the --dbpath parameter)
- Server, Port, DB and Collection are self-explanatory
- I've checked 'drop collection if exist'. Obviously that's just for testing purposes.
- Data File: what we specified in the previous job as file to save to
- File type: JSON
- Action on data: Insert
Yes, you're right if you’re frowning a bit now. It should be the other option; 'upsert', but then I would have to configure the unique key from the tweet to be used as 'key' in the document store. Here we define it as the unique identifier to use to decide update or insert.
In this example (with a drop collection) I'm rebuilding every time. If you're not dropping the collection and have duplicate tweets, you will get an error (if you've mapped the tweet ID to be the MongoDB _ID).
Run the job and then open mongoVue (or CLI) to check if the correct count of items has been inserted. In my case the job output stated that 10 tweets had been processed, so that's the correct number.
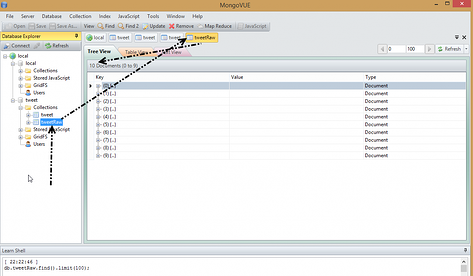
To check this, click on the [+] button. It should not show just a single field (e.g. 'jsonString' as the fieldname), but also the rich tree structure that is a tweet.
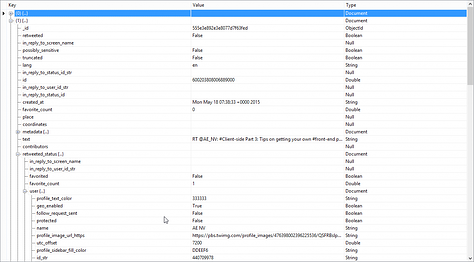
It's not the purpose of this post to go further into the use of MongoDB, nor the richness of the information that can be extracted with the full embedded tree structure, but I'll give a quick example:
In the screenshot above you can see that there is a field (for a tweet) that is called 'retweeted_status'. That in itself is an object which has a number of fields. One of those fields is 'favorite_count' (how many times has a retweet been marked as favorite). Let's say I want to see which one of our tweets was picked up by others and then favorited (so not directly favorited, which is represented in the 'favorite_count' field in the root). Using MongoVue, you get something like this:
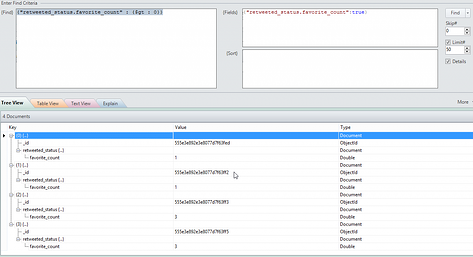
Using the command line client; you would give following command:
<strong>db.tweetRaw.find({ "retweeted_status.favorite_count" : { "$gt" : 0 } }, { "retweeted_status.favorite_count" : true });</strong>
This is just a basic first step. I'll provide some follow-ups on how this can turn into a more complex system, using Hadoop, Neo4J and other technologies to really make it a data scientist exploration story. If you have a question, please do not hesitate to leave them in the comments section.